 Brenden Bixler
May '25 Blog Updates
- New color theme (I am not a designer, but I did improve the light and dark themes)
- Linked my prior Deepseek article in the header navigation
x402
x four-oh-what? x402 is a proposed standard for internet payments by Coinbase that enables monetization based on minimal transaction costs (~1 US cent per transaction compared to a more typical 2.9% + 30 cents processing fee). This effectively enables micropayments - the monetization of APIs and AI Agents in a far simpler manner than was previously possible.
Heading into the second half of '25, this space is hotly contested. Stripe has just introduced Stablecoin Financial Accounts, designed to enable seamless transfers between stablecoins and fiat (traditional currencies). Their goal is to minimize friction and improve the cryptocurrency user experience, although the technical bar remains a hurdle for broader adoption.
If you're reading this, odds are that you are more technical in nature. Don't worry, code is coming up soon, nerd.
Show me the $
What are we building?
Let's hold an API and an Agent ransom, only allowing the user to access if they pay for it. Full disclosure, this is a modified version of example code from this Coinbase Github Repo Let me save you time connecting dots that are assumed crypto knowledge to make this work.
Endgame
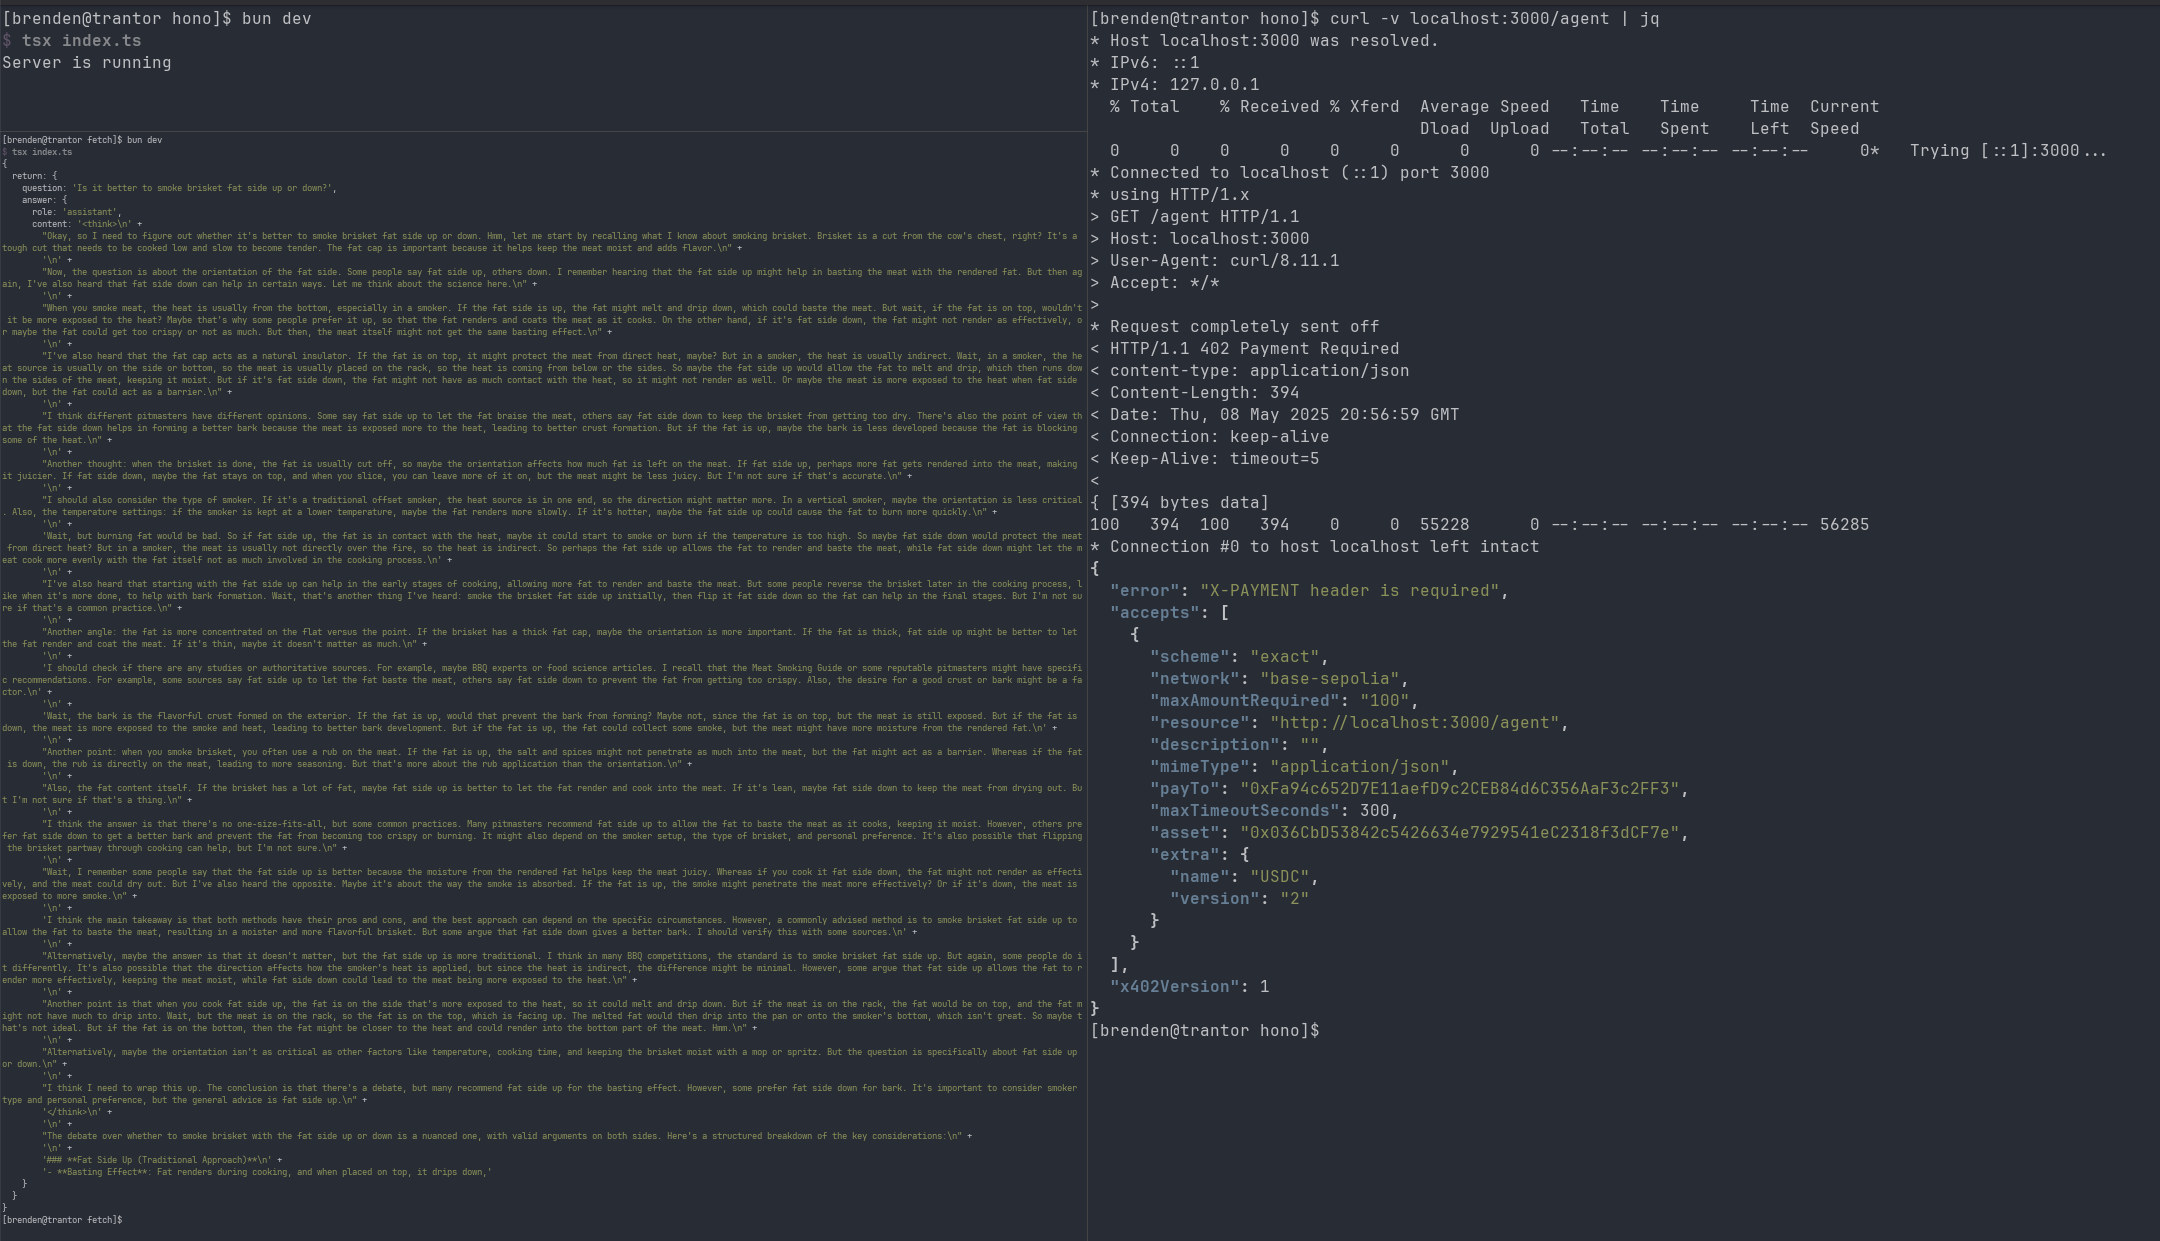
When we're done and assuming you're using a fancy terminal emulator that allows you to split windows, you'll see something similar to the screenshot below. One window will run our server, with middleware that sends a 402 payment requested header when our endpoint is requested. The second window (top right corner) shows the payment request header returned from the server, with a requested amount and who to pay. Finally, the barely legible green text on the left-hand side is the output of a successful AI agent inference call. I've asked the model to opine on whether it's better to smoke a brisket fat side up or down and frankly it responded as verbosely as I would if asked the same question.
TL;DR - Fat side up for pellet grills, fat side down for offset cookers. Bark will be best fat side down for all grill types, but... ok, I'll stop.
Preparation
- Bun - JS runtime. Node works too, but I like Bun - faster, fewer moving parts.
- Git - Git for source code management
- Hugging Face API Key - Sign up for free. Click your profile -> Access Tokens. Create a new token. Will look like
hf_XXXXXXXXXXXXXX - Coinbase Wallet - See instructions below for setuping up two separate wallets.
Source Code
git clone https://github.com/bbixler/x402.git
Crypto Setup
To make this work, we need to perform three steps:
(A) Setup a wallet to receive funds
(B) Setup a source wallet and provide test funds (to pay for API access)
(C) Configure our server and client apps so that they know how to process this transaction (source -> pay for API -> deposit funds)
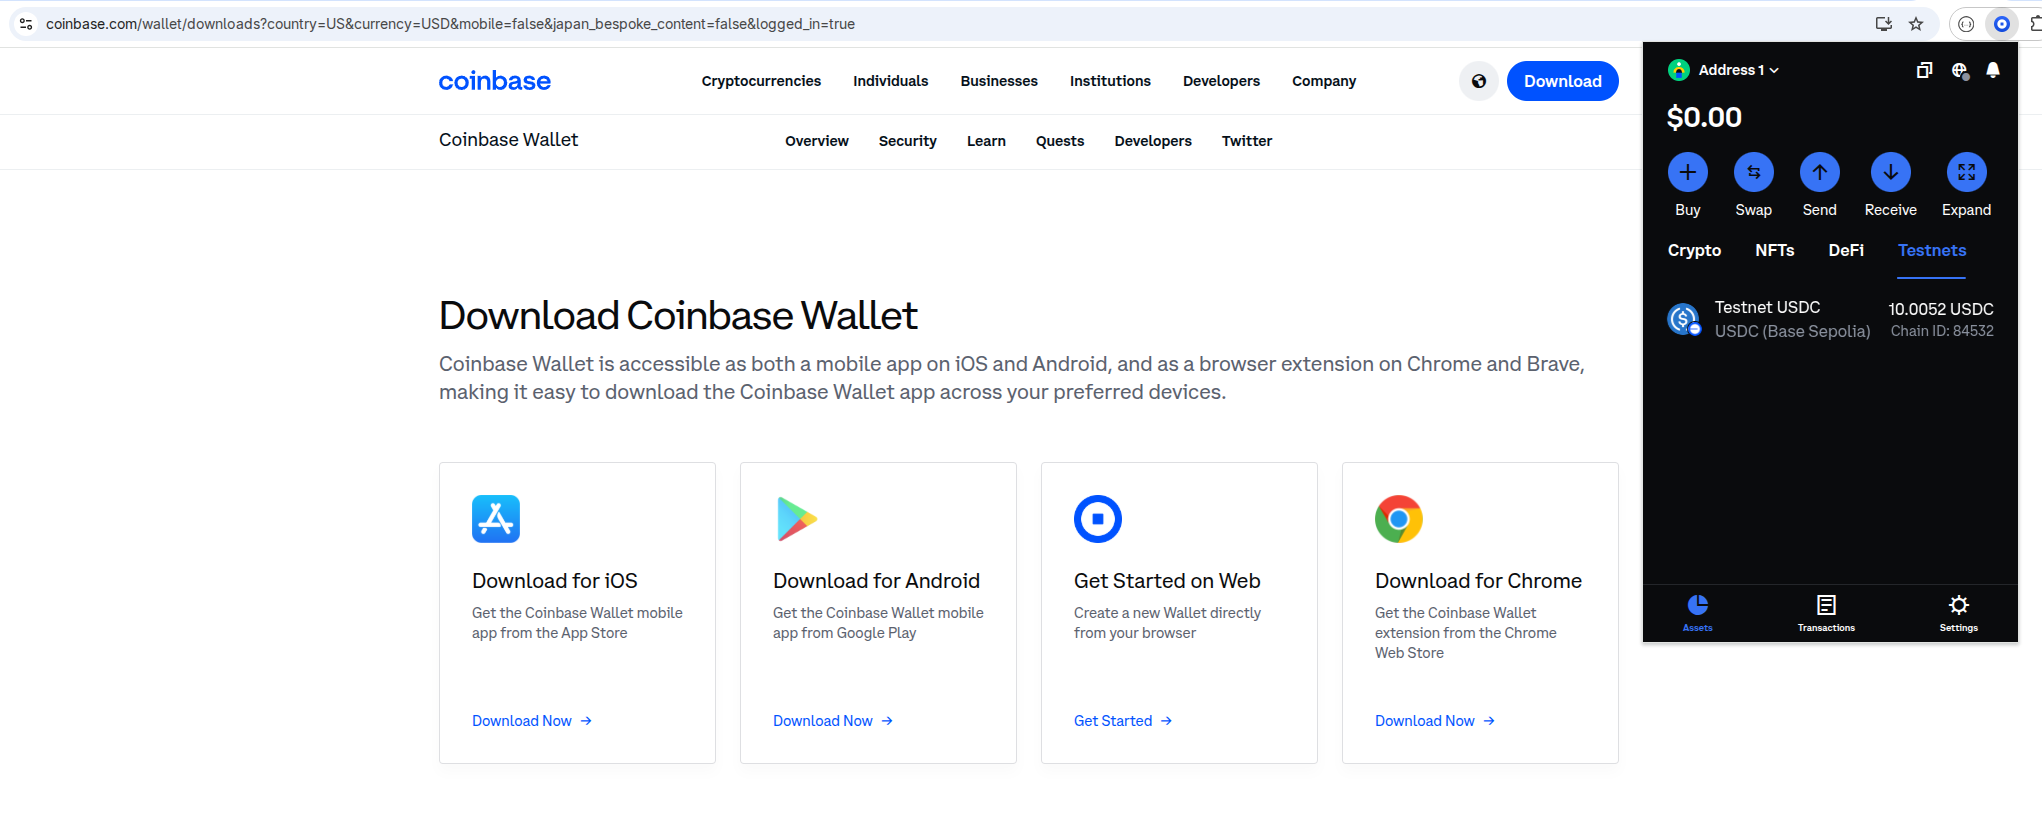
(A) Destination Wallet Creation
- Signup for a Coinbase Wallet - I chose the Chrome browser extension
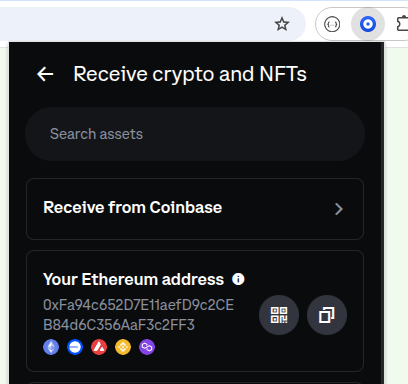
- Refer to the screenshots below to click the Receive button and finally to copy the Ethereum address from the wallet
- Retain that address - will be needed in the third step.
(B) Source Wallet Creation Just like in the real world, we need a separate account (wallet address) to act as our source of funds. Luckily, it's easy to create a second wallet within Coinbase wallet.
- In the top left hand corner (where it says Address 1), click the arrow to expand and you should see a button - "Add & manage wallets". Click the gear icon.
- Click "Create new wallet" and follow the same process as before
- At the top of the wallet, it should now say "Address 2" unless you edited and provided an alias. Click the blue receive button (as before) to copy the address.
- Now we need to add some funds. Navigate to the "faucet", paste the (address 2) Eth address below AND select USDC as the token.
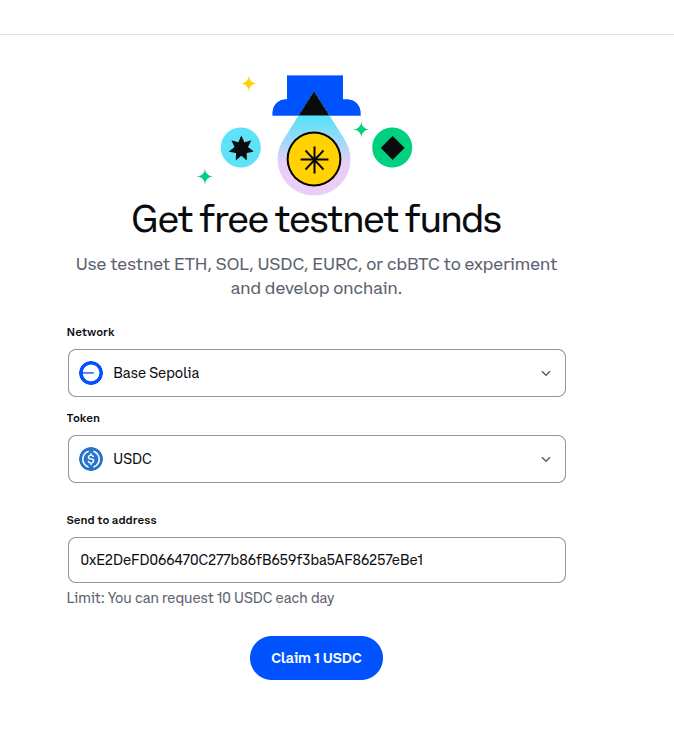
- If you click out and back into the wallet, you should see "Testnet USDC" - 1 USDC has been deposited. Sweet.
- Almost there. In order to sign the transaction, we need to get Address - 2's private key. More clicking.
- Click the Coinbase Wallet browser extension. Make sure "Address 2" is at top - the source wallet. Click the settings gear (bottom navigation). Click Developer. Click Show private key. Copy this badboy.
(C) Configure sending funds
-
Edit
/server/.envand setADDRESS=PASTED-ETH-ADDRESS1-HERE(from (A)) -
Edit
/client/.envand setPRIVATE_KEY=PASTED-ETH-ADDRESS2-PRIVATE-KEY(from (B))
Showtime
Dude, that was a lot of setup. I agree, but your patience will now be rewarded.
First, let's go the terminal and run our server. The server defines the endpoints that require payment.
cd server
bun install
bun dev
If everything is working properly, you should see a simple console message Server is running
There are two files in play - let's break them down.
/server/.env
HF_API_TOKEN=hf_XXX # Hugging Face API token
FACILITATOR_URL=https://x402.org/facilitator # Coinbase provided faciliator URL
NETWORK=base-sepolia # Test network. Set to base for production.
ADDRESS=Your-wallet-address # Wallet Etherum address
Bog standard key value pairs in the .env file. x402 requires a facilitator - essentially an endpoint that helps to mediate between your application/client and the Crypto payment network - in this example, using the Base test network "sepolia". Base is an L2 Blockchain, developed atop Ethereum.
If you aren't a crypto bro, it's normal for this to feel slightly overwhelming. Coinbase (and many others) allow you to take fiat currency (US dollars, for example) and convert to different types of Crypto currency (as well as to redeem back in fiat). We're using Base (based on Ethereum) and a stable coin (US Dollar Coin - USDC) which is effectively pegged to the US dollar value for payments. Unlike traditional payment processing which can be expensive - we can make/accept micropayments using Crypto for the equivalent of 1 US cent. This, combined with agentic AI/automation, opens up many new monetization use cases.
Now, on to our actual server - /server/index.ts
import { config } from "dotenv";
import { Hono } from "hono";
import { serve } from "@hono/node-server";
import { paymentMiddleware, Network, Resource } from "x402-hono";
import { InferenceClient } from "@huggingface/inference";

config();

const facilitatorUrl = process.env.FACILITATOR_URL as Resource;
const payTo = process.env.ADDRESS as `0x${string}`;
const network = process.env.NETWORK as Network;
const huggingFaceAPIToken = process.env.HF_API_TOKEN;

if (!facilitatorUrl || !payTo || !network || !huggingFaceAPIToken) {
  console.error("Missing required environment variables");
  process.exit(1);
}
Import various libraries and read in our key/value pairs.
const app = new Hono();

console.log("Server is running");

app.use(
  paymentMiddleware( call.
    payTo,
    {
      "/weather": {
        price: "$0.0001",
        network,
      },
    },
    {
      url: facilitatorUrl,
    },
  ),
);

app.get("/weather", c => {
  return c.json({
    report: {
      weather: "rainy",
      temperature: 56,
    },
  });
});

serve({
  fetch: app.fetch,
  port: 3000,
});
This is the heart of our server app. We're using Hono (modern web framework) to host a single endpoint, /weather. I've hard-coded the weather returned - feel free to modify if your weather is better than mine. The paymentMiddleware does the real work - we pass it the wallet address and how much we want a user to pay to access our endpoint. If the payment succeeds, the server will render /weather.
What happened to making an agent call? That code is listed below. I prefer testing with a static mock endpoint, simulating an API call to ensure everything is working first before I switch over to the agent call which introduces real-world latency, thereby reducing developer friction.
app.get("/agent", async c => {
  const client = new InferenceClient(huggingFaceAPIToken);
  const question: string = "Is it better to smoke brisket fat side up or down?";


  const chat = await client.chatCompletion({
    provider: "fireworks-ai",
    model: "Qwen/Qwen3-30B-A3B",
    messages: [
      {
        role: "user",
        content: question,
      },
    ],
  });

  return c.json({
    return: {
      question: question,
      answer: chat.choices[0].message,
    },
  });
});
This second endpoint performs agent inference. Conceptually, it works the exact same way as the weather endpoint. Keep reading for instructions to configure the agent endpoint.
FYI - paymentMiddleware can accept an array of URLs as well.
At this point, we want to validate that calling the weather endpoint returns the x402 header (demanding payment), as expected.
In your terminal, run this command: curl -v http://localhost:3000/weather (or /agent if you modified it)
Hopefully, you see something similar (albeit not as nicely formatted)
< HTTP/1.1 402 Payment Required
< content-type: application/json
< Content-Length: 396
< Date: Fri, 09 May 2025 17:12:17 GMT
< Connection: keep-alive
< Keep-Alive: timeout=5

{
  "error": "X-PAYMENT header is required",
  "accepts": [
    {
      "scheme": "exact",
      "network": "base-sepolia",
      "maxAmountRequired": "100",
      "resource": "http://localhost:3000/weather",
      "description": "Pay to see the current weather",
      "mimeType": "application/json",
      "payTo": "0xFa94c652D7E11aefD9c2CEB84d6C356AaF3c2FF3",
      "maxTimeoutSeconds": 300,
      "asset": "0x036CbD53842c5426634e7929541eC2318f3dCF7e",
      "extra": {
        "name": "USDC",
        "version": "2"
      }
    }
  ],
  "x402Version": 1
}
This output indicates that the /weather endpoint is protected and requires payment to access.
Do I need an umbrella today?
Let's make a simulated client call (akin to calling an API from a webpage), issue payment, and receive our weather report (or output from the Agent). Head back to the terminal, open a new window (be sure to run the server running in a separate terminal instance) and run the following:
cd client
# install dependencies
bun install
# run index.ts
bun dev
If it worked, you should see the console { report: { weather: 'rainy', temperature: 56 } }. You can click the Coinbase Wallet Extension -> click Transactions and see the transaction recorded on the blockchain.
Done!
If you made it this far, kudos. Try editing /server/index.ts setting the endpoint to /agent and /client/.env (same change) to see the agent call. Stop/re-start both the server and then client (using the instructions above) for AI to elevate your BBQ game.